

To control a single light from three different positions – such as when that light is located at the ends of a long corridor with a switch at each end and at a switch in the middle; or when the light is located at the top and bottom of a long flight of stairs; or when it is located at a light, living room and the light is at opposite ends of the living room with the switches at both ends – is a very popular job to do at home and the one that is often misunderstood. To control one light from three switches it might seem at the first moment that one needs to make use of three 3-way switches, however in actuality that is not the case. You will need two 3-ways and one 4-way switch – the latter will be installed in such a manner that it will occupy the middle position of two pairs of wires and it will only change the position of the wires in between the pairs of terminals to allow the third switch to control the circuit. This tutorial will provide all the details of wiring or wiring from the very beginning.
In short: Yes, it’s possible to control a light fixture with three switches, but two of these switches must be the three-way type and one of them must be the four-way type. The flow of electricity is as follows: first, power is supplied to the first three-way switch (which is wired into its common terminal), then,from the first three-way switch, the supply proceeds to the four-way switch through the pair of traveler wires, and moves on to the second three-way switch through the second pair of traveler wires, from where it goes into its common terminal and finally reaches the light fixture. The four-way switch becomes a junction in the course of electricity supply, and, although it has four wires (two IN and two OUT), it is never connected to the electricity supply nor to the lamp, and its role consists in switching the traveler wires. Different colors of wires are used in the United States; there black wires are usually employed for the connections to the common wire and traveler wires, and the neutral wire is white and the ground is green or bare.
Before you take the screwdriver in your hand, it is useful to realize what each switch does, as without understanding the logic behind it, the wiring wouldn’t make sense.
The 3-way switch (the 2-way switch in the UK) has three terminals – one common terminal, which is usually darker than the rest or has the “COM” marking, and two traveler terminals. The inside of the switch makes the common terminal connection with one of the traveler terminals, either of them, but never both at the same time. This is basically the trick: switching the lever simply changes the connection.
The 4-way switch (intermediate switch in the UK) has four terminals – two from one side (IN) and two from the other side (OUT) – and is located among the traveling wires. The only thing this switch does is switching travelers from one to another. In one case, it allows the travelers to go through; in another case, it makes them swap places. The principle of swapping them at the middle remains the same as that of flipping the end switch – the light turns on or off.
So, the full circuit is 3-way (location 1) – 4-way (location 2) – 3-way (location 3). Moreover, it is possible to add more locations by adding more 4-way switches.
Electrical work ends up being the cause of innumerable fatalities across the globe year after year. Following a similar pattern, almost each one of these accidents can be especially pinpointed to a single cause: one of the steps has been omitted by a certain individual. The rules are as follows:
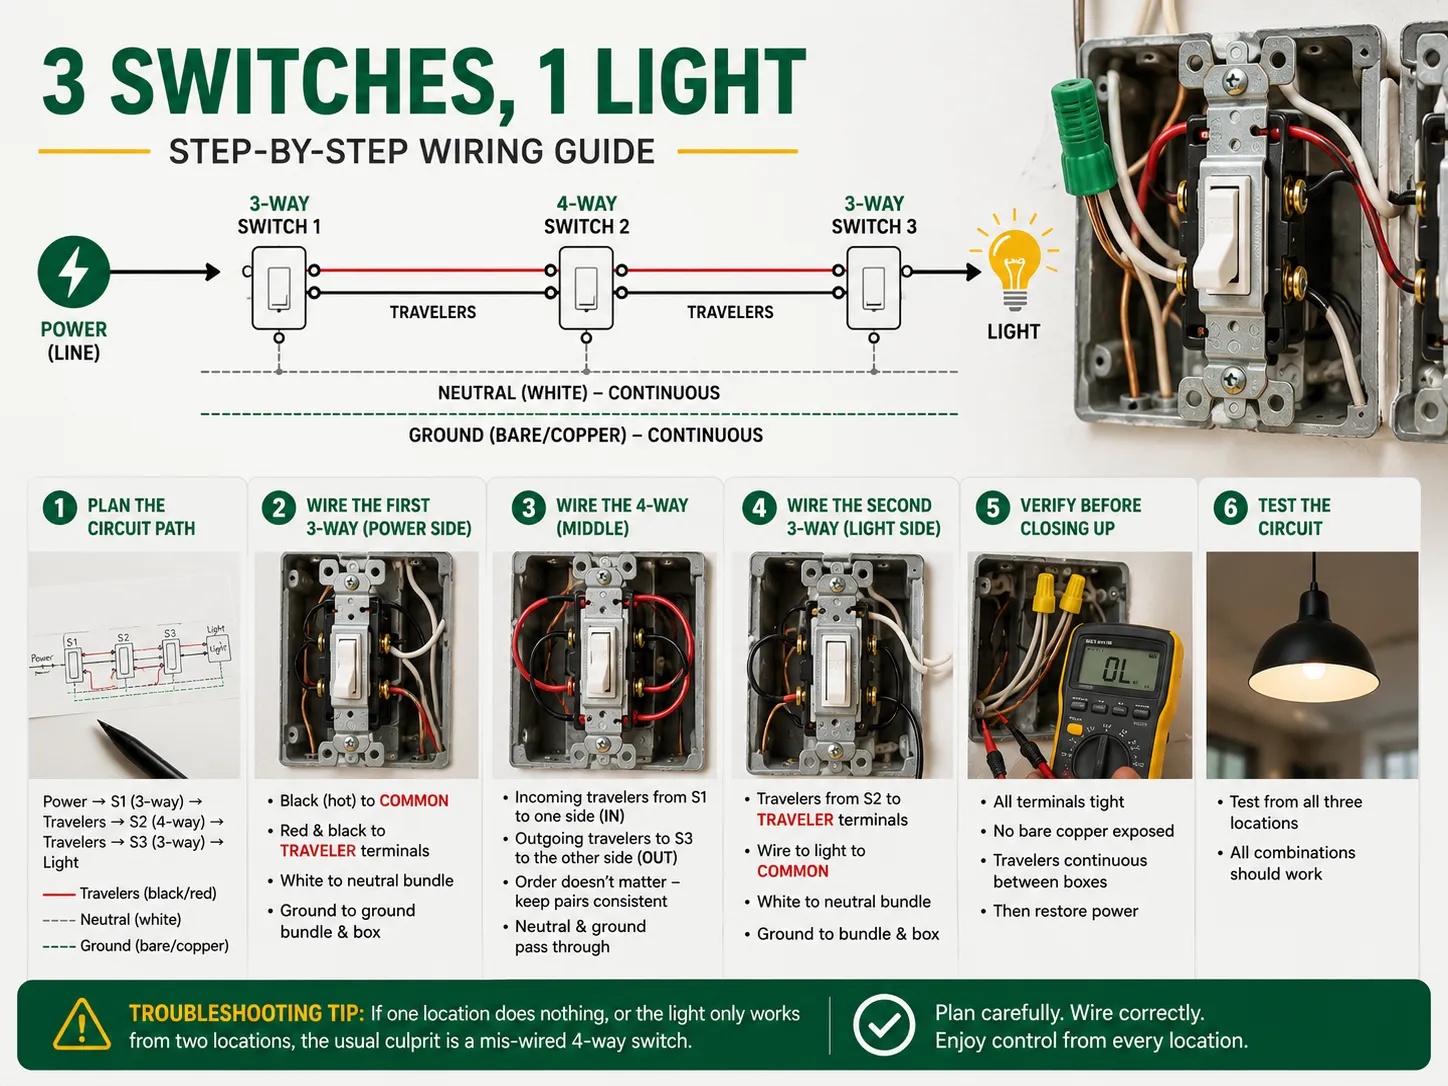
Assuming that the power supply comes to the first 3-way switch box (which is the most common form of wiring in homes), the circuit that powers the light will come from the second 3-way box.
Color conventions differ by country, and getting them wrong is a code violation and a hazard:
| Funkcjonować | US (120V) | UK/EU (230V) |
|---|---|---|
| Line/hot | Czarny | Brązowy |
| Neutral | Biały | Niebieski |
| Ground/earth | Goła miedź lub zielony | Zielony/żółty |
| Travelers | Black and red (often in 14/3 cable); white may be used if re-identified with tape | Two cores from 3-core cable, commonly brown/grey or brown/black depending on cable; no neutral colors used as travelers |
In America, the electrical code states that if a white wire is used as a traveler due to only having 14/2 wire between boxes, it must be marked with a tape at both ends so that people don’t confuse it with a neutral wire. Meanwhile, in the UK, travelers are represented by the two phase wires of the 3-core-and-earth cables which carry a neutral wire. Hence, it is illegal to use a neutral wire as a traveler in the UK.
The largest memory trap in this area is the terminology which is used in different regions. A US three-way switch would correspond to UK two-way switch, and a US four-way switch would be called a UK intermediate switch, respectively. If you purchase a “three-way” switch in the UK, you will get a single-pole switch which will not work for your purpose at all. The logic of the wiring is similar in both cases: two end switches and one intermediate switch; however the names, colors of the wires, voltages (120 volts in the USA, and 230 volts in the UK) are all different along with the code (NEC in the USA and BS 7671 in the UK).
If you are replacing switches rather than wiring from scratch, the discipline is the same as for any switch swap — our guide to instalacja włącznika ściemniacza covers the terminal-by-terminal approach, and the different kinds of electrical switches explains where 3-way, 4-way, and other switch types belong in a home.
Once the breaker is reset, check from all 3 switches:
For the final test of the circuit, using a multimeter, check for continuity between the pair of travelers while the power to the circuit is off. There should be continuity between the two travelers at one 4 way switch position and from the cross connected pair to the other pair.And if you are also planning smart or dimming controls on the same lighting circuit, check the switch type compatibility first — the ceiling fan dimmer guide i dimmer vs fan switch comparison explain what loads each control type can handle. While the plates are off, it is also a good moment to consider modernizing the rest of the room — the przewodnik po modernizacji inteligentnych gniazdek ściennych shows how simple receptacle upgrades pair with fresh switch plates for a coordinated finish.
Yes, it is possible for three switches to work together controlling the same light with the use of two 3-way switches positioned on two ends and one 4-way switch placed in between them. The function of the 4-way switch is to switch the traveler wire making controlling the light possible from the central position of the switches. The same principal can be used in case of adding more switches to control the light.
Yes and no. The power wire has to be connected to the proper terminal in order to make the circuit work. However, the traveler pairs may be switched between the terminals as long as they are consistent in both boxes. As for 4-way switch wiring it requires using opposite traveler pairs when connecting it.
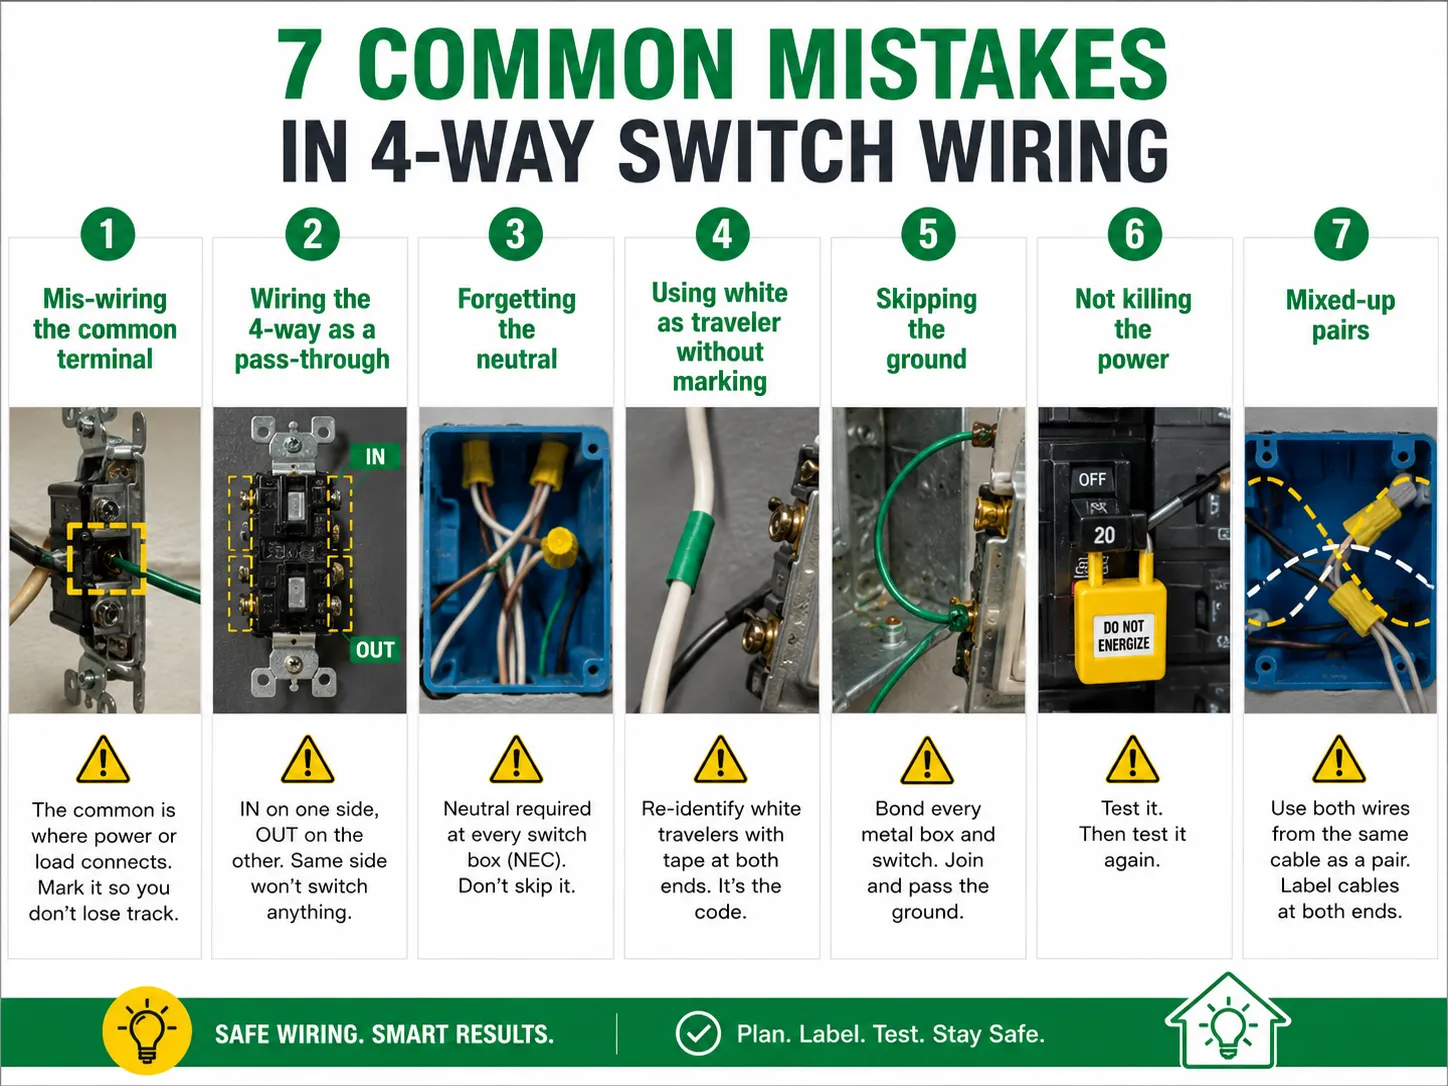
Many mistakes are possible, namely connecting the hot wire to one of the traveler switch terminals, connecting all traveler pairs to one side of the 4-way switch (so that the switch does not do any of its functions), not using neutral wire and re-identifying the white traveler wire, failing to connect the ground wire, crossing the traveler wires between different cables, and the most frequent fault is failure to turn the circuit off prior to making the electrical connections.
With the circuit whole circuit operational, it should be possible to control the light from every switch independently from each other. In addition, turning the power off will allow testing the traveler wires.
When you finally grasp how to wire a single light fixture to three switches, you will find the experience very gratifying: two 3-way switches at each end and one 4-way switch in the middle responsible for switching the traveler wires and additional 4-way switches connected in series. The legwork is very straightforward: there are only a handful of switches, two pairs of travelers, and a common wire at each end. The difficult part in electrical wiring is the same in all cases: disconnecting power, verifying with a tester, observing the color code, and labeling the wires. Just make sure you connect common terminals, keep your pairs in order, and everything will work forever.

Termin “07984 konsultanci oświetleniowi” daje ludziom wrażenie, że pięć cyfr reprezentuje jakiś rodzaj kodu pocztowego, który wskazuje miejsce, w którym konsultanci oświetleniowi świadczą usługi. Jest to jednak nieprawda: nie ma obszaru pocztowego oznaczonego kodem 07984, który jest tylko kodem telekomunikacji mobilnej w Wielkiej Brytanii. Oznacza to, że […]

San Francisco nie jest przeciętnym rynkiem kontroli oświetlenia. Zasoby mieszkaniowe są stare i gęste, a kodeks elektryczny nie pozwala na tak wiele instalacji elektrycznych, jak to jest dozwolone niemal wszędzie indziej w USA. Większość domów, które chcą skomplikowanego oświetlenia, to budynki wiktoriańskie lub edwardiańskie, w których nikt nie chce zaczynać otwierania […]
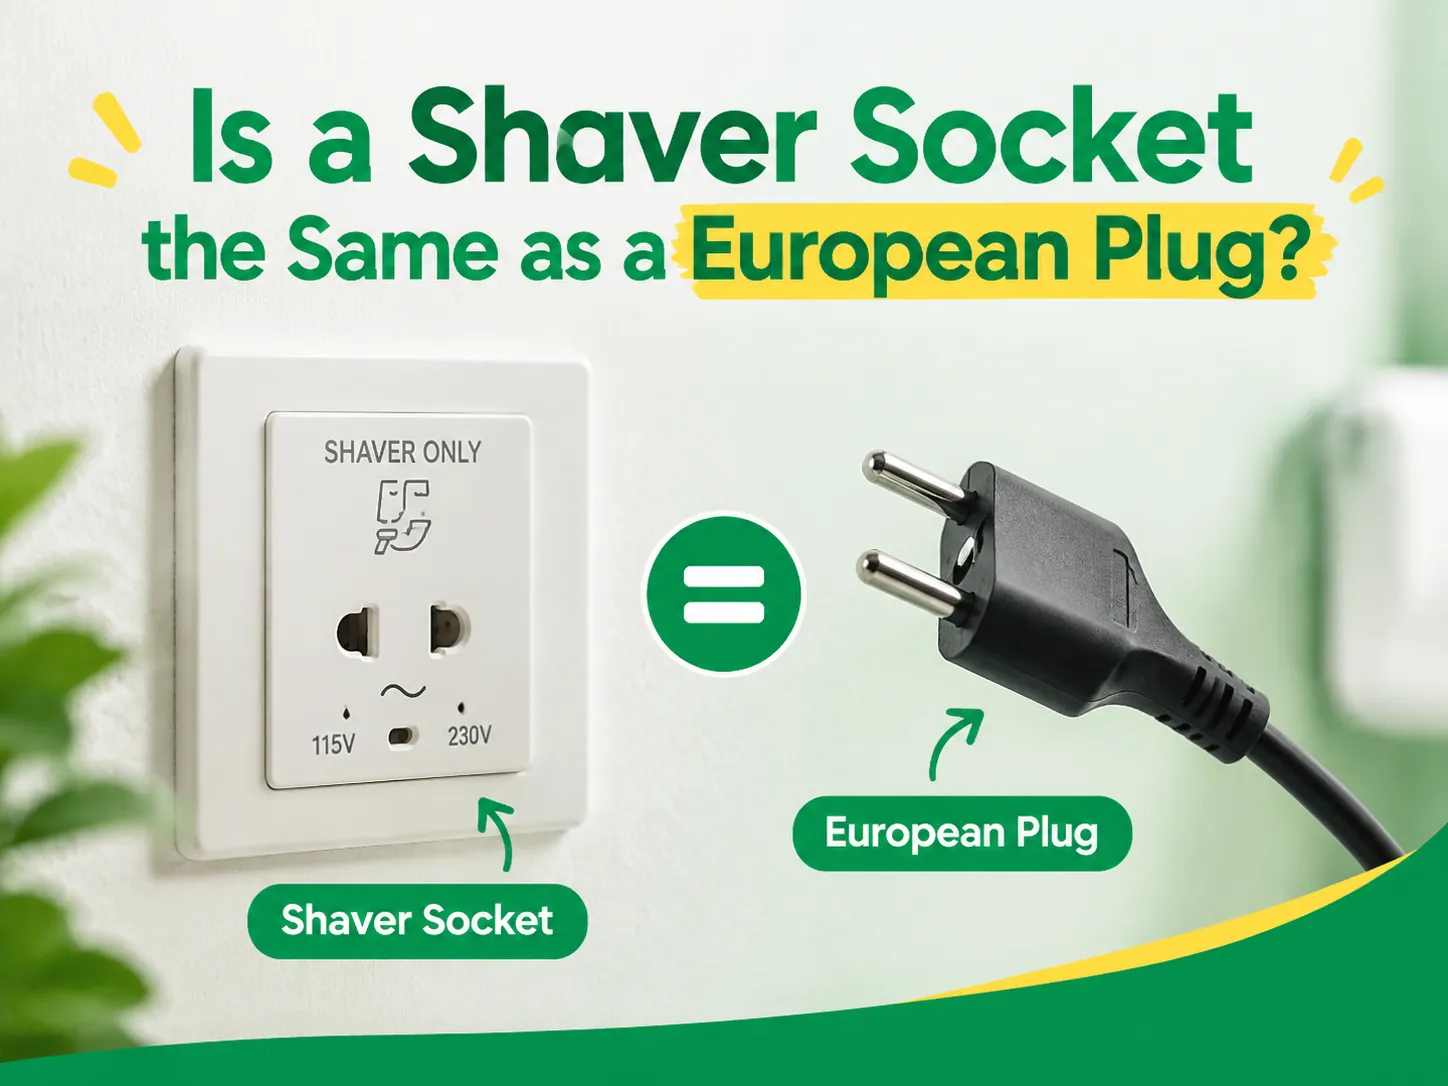
Chociaż wydają się być podobne, obie mają okrągły kształt z dwoma pinami i działają przy napięciu 230V. To wyjaśnia, dlaczego niektórzy turyści używają europejskiej wtyczki z brytyjskim golarką lub zastanawiają się, dlaczego golarka nie może być podłączona do gniazdka Schuko w hiszpańskim hotelu. W rzeczywistości, one […]

 Droga Tuozhan nr 6, Leshang Pioneer Park, port Yueqingwan Bay, miasto Yueqing, prowincja Zhejiang


