

The first measurement of the height takes place on a blueprint whereas the second establishes the height on-site after it turns out the thickness of the constructions is 20 mm thicker than indicated in the drawing because it is the second option that matters the most.
As for the practical aspect of the issue, it raises the questions about the reference point, thickness of the floor, flushness of the electrical box, and distance of the socket from the ground.
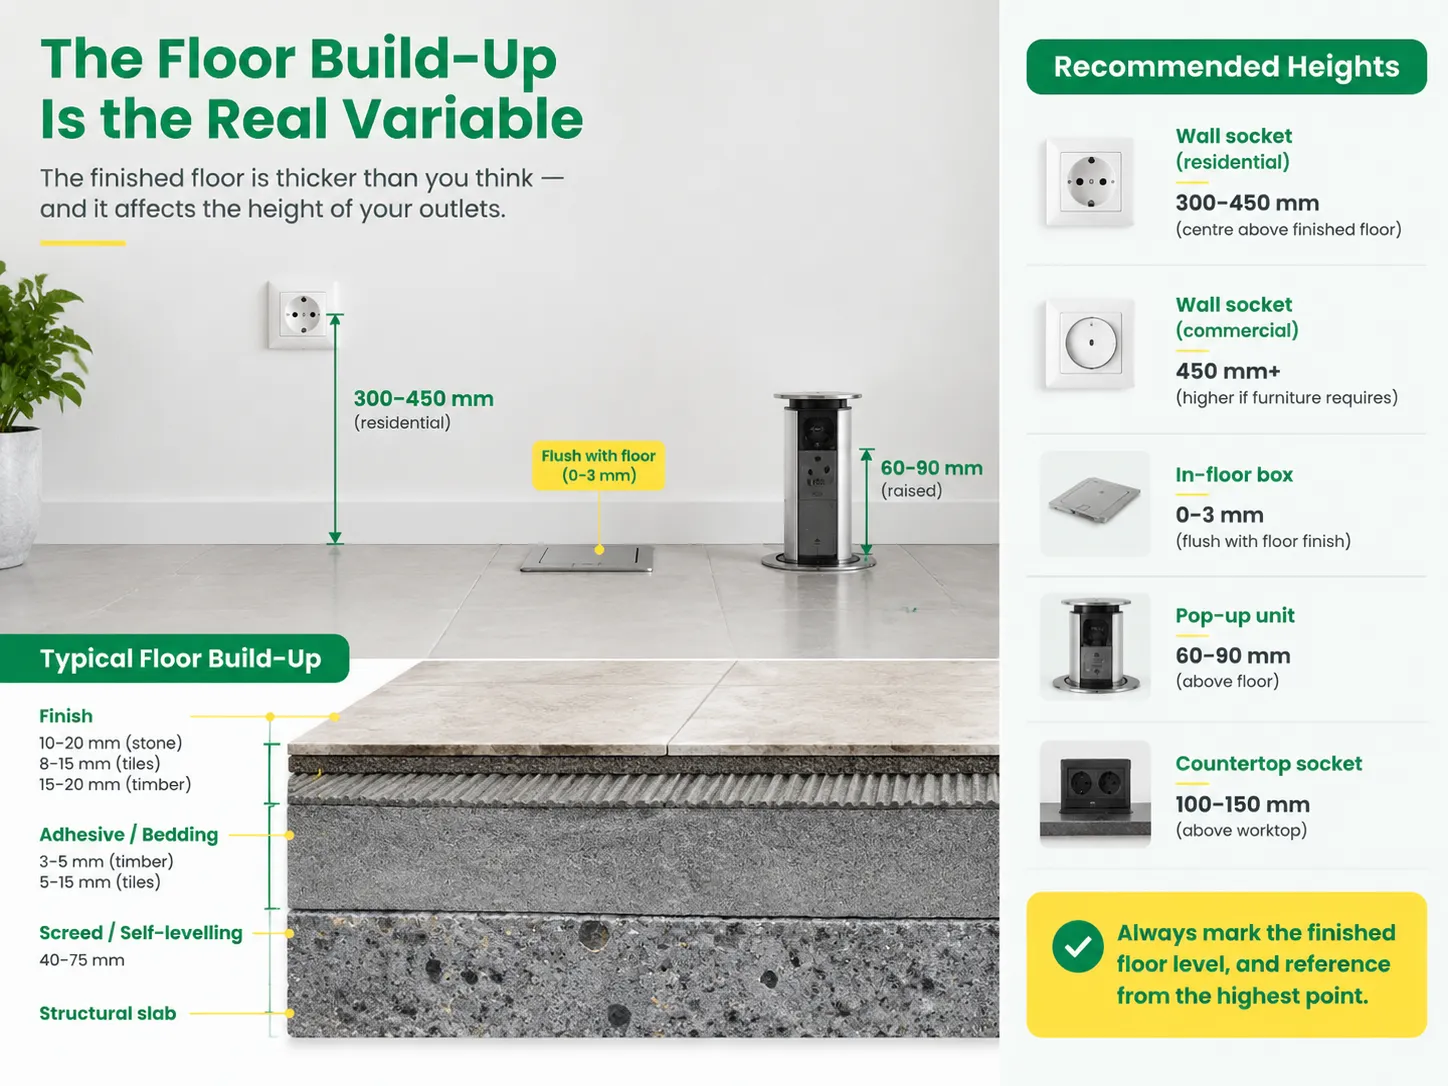
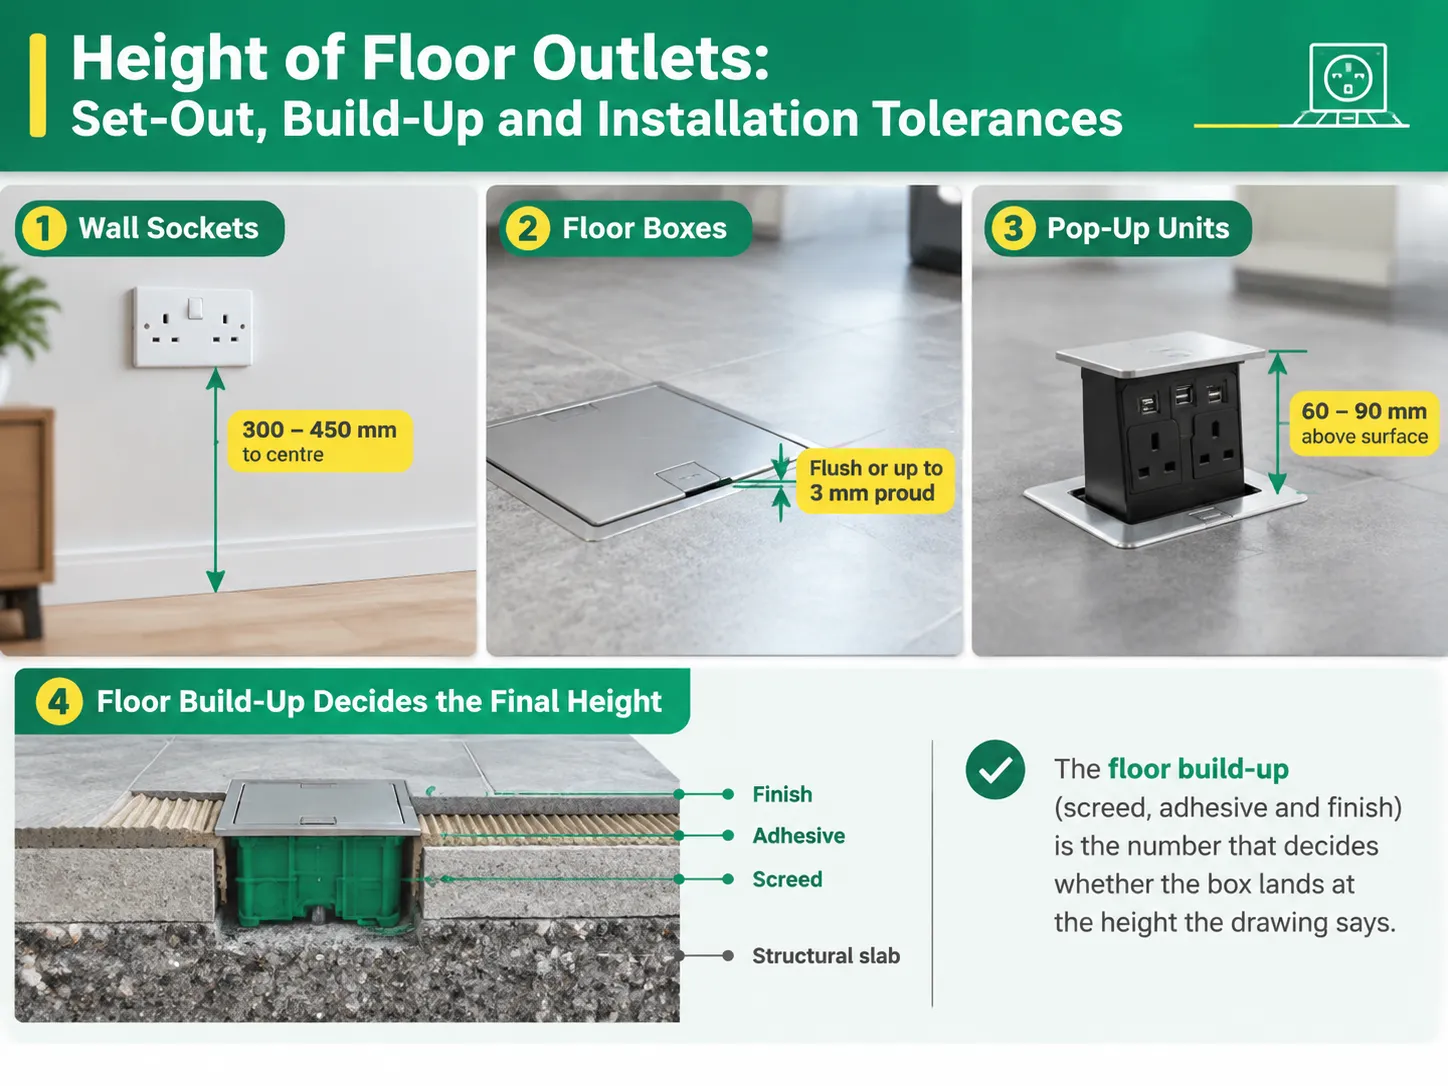
In conclusion, it is very important to remember that the outlet should be measured from the finished floor instead of the structural slab. In general, the wall outlets are situated between the measurements of 300-450 mm in the middle of the outlet. The floor boxes could be either flush with the floor finish or no more than approximately three millimeters higher than the floor finish. It should be noted that pop-up units need to have around 60-90 mm above the surface before plugging them in. The height where the box finishes will be in the right position in the drawing depends entirely on the floor finishing material used.
The distance between the structural slab and the floor is occupied by three different thicknesses, all of which have to be determined after the trades come in.
So, in summation, the floor that was supposed to be at 60 mm is now made 85 mm in height. As a consequence, all the sockets are lowered by 25 mm in total in relation that they should have been located, and floor boxes built at the level of the slab will end up being located even lower than the floor level, which is exactly the gap that collects water and makes people trip over.
What makes it so that mistakes of this kind are avoided is a painstakingly boring procedure of marking the finished floor level on the walls with a permanent marker and using its level to set everything else after importing it into the room. The reference point should always be taken from the highest existing point, as otherwise a perfectly flat-looking floor will result in a mismatch between levels of sockets.
| Device | Dimension | Common value |
|---|---|---|
| Wall socket, residential | Centre above finished floor | 300 to 450 mm (12 to 18 in) |
| Wall socket, commercial | Centre above finished floor | 450 mm, higher where furniture dictates |
| In-floor box, flush cover | Proud of the floor finish | 0 to 3 mm, never recessed |
| Pop-up unit, raised | Above the surface | 60 to 90 mm floor, 80 to 150 mm counter |
| Countertop socket | Above the worktop | 100 to 150 mm |
The residential and commercial figures are convention instead of law in most jurisdictions, which is why they differ between countries and why the standards survey sits better in a dedicated reference: the market-by-market numbers, the spacing rules and the accessibility envelope are set out in this guide to the standard height of floor outlets.
What is important to note here is that the information remains constant throughout all regions. A 300 mm socket located in Germany, even though it has a height of 300 mm from ground level, will be considered wrong when judged from the slab level.
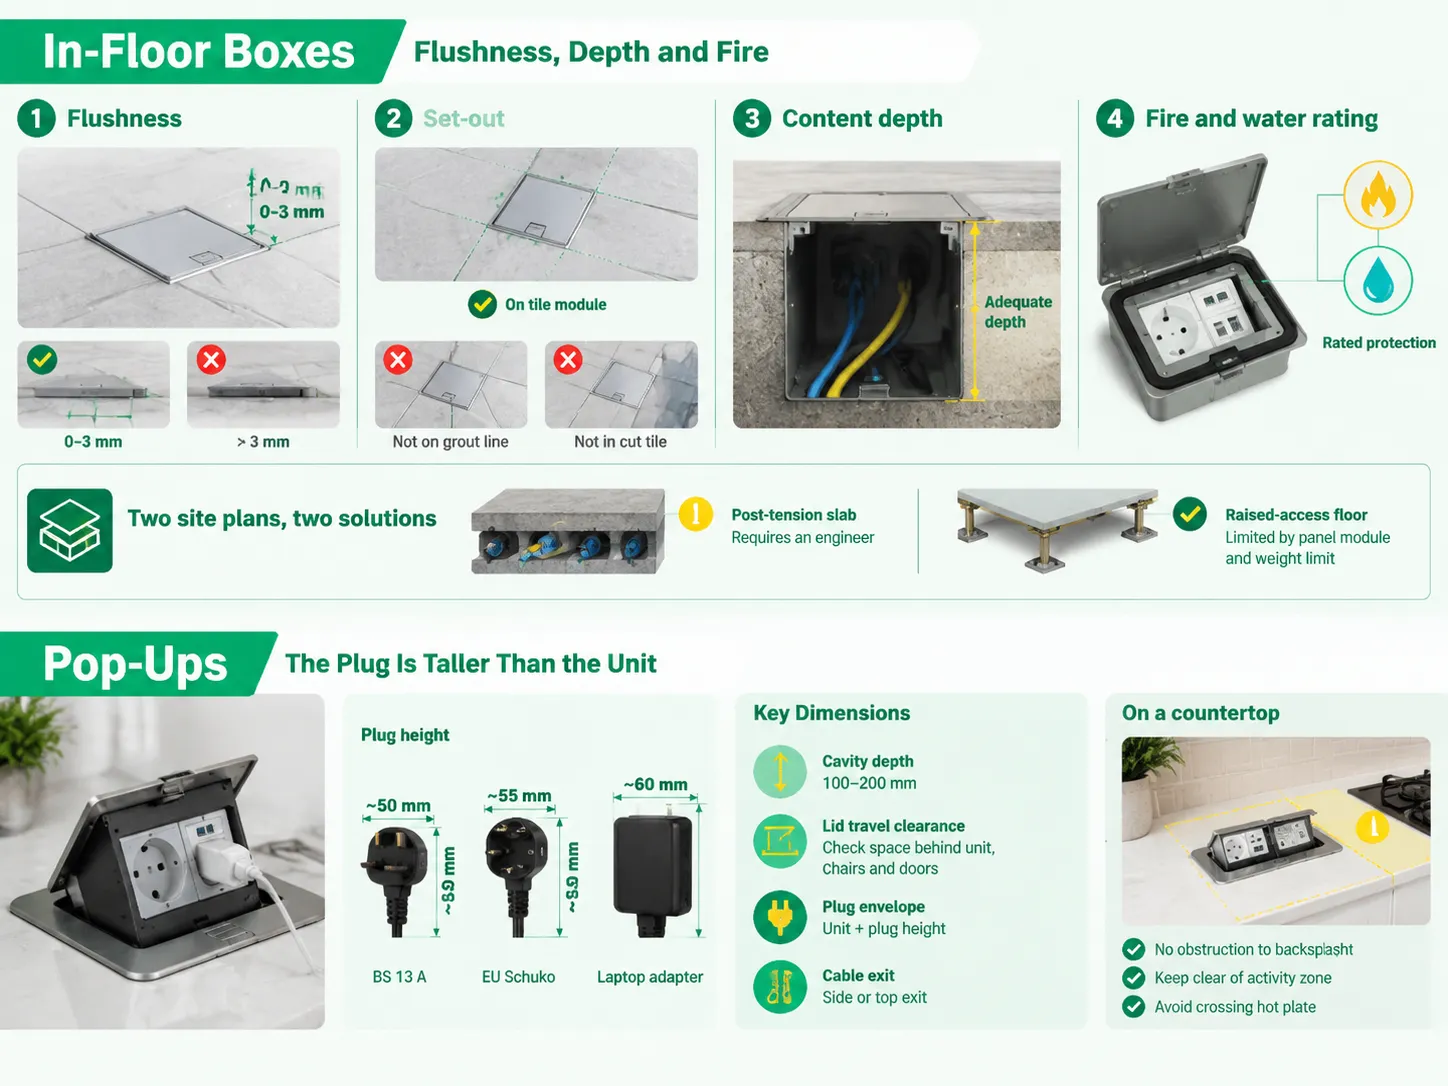
Four factors are considered while assessing a floor box.
Two site plans alter everything. When working on a post-tension floor slab, the installation of a new box becomes a problem without the involvement of an engineer. However, with a raised-access floor, there is no problem with slab thickness, but instead, the only limitation becomes the panel module and the weight limit of the tile.
A pop-up measuring 90 mm might sound very useful until a plug is put on the device. The height of the British Standard 13 A plug is approximately 50 mm tall, the EU Schuko is about 55 mm tall, while the built-in plug of a laptop adapter is likely to measure around 60 mm. This gives us an obstruction of at least 140 mm, not 90 mm.The following numbers determine the operability of a pop-up:
The same logic works with a countertop as well. It must not obstruct the backsplash nor the zone of activity, and in addition to that, wiring must not intersect with the hot plate.
Height is just part of functionality. What’s in front of the appliance makes up the other half.
A socket at a height of 300 mm behind a 900 mm deep worktop complies with official standards and is unreachable. A socket at a height of 450 mm behind a desk 600 mm deep can be reached by someone sitting at the desk only. A floor box placed under the conference table is useless if there’s a solid board along the base of the table without any space left.
The golden rule is to start from the furniture and not the wall. Draw the layout of your furniture and measure the area along the wall. After that, find the spot for the electrical boxes and test if the plug does not touch the drawer, skirting or radiator. The wiring sequence that follows — box fill, conductor capacity, termination — is described in this guide to installing a power outlet.
In workplaces and public area, floor boxes are assembled in a grid that relies on furniture structure, as opposed to the wall framework. The distance between the boxes generally varies between four and six metres and is determined based on modular workstations allowed by the office layout, which guarantees that the distance from any desk to the box is no more than standard lead length.
This leads to three basic requirements.
It is worth mentioning that any floor box can represent the frames with standard wall plates in it.A media plate such as this wall-mounted HDMI socket is the kind of module that ends up in one, which is why the depth of the box and the depth of the plate have to be considered together.
Inserting a floor box into an already set slab entails core drilling along with three additional requirements needed to complete the process.
The core is required to stay clear of reinforcements and post-tensioning cables, which implies using a scanner and hiring an engineer for post-tensioned slabs. In addition to this, the drilling process is required to be conducted efficiently so that fire and water-proofing are ensured, rather than just filling the hole with mortar. It also means that the drilled hole has to stay deep enough to fit in a proper service; however, shallow slabs require shallow holes and therefore reduce the number of devices that can be used.
When it comes to low wall socket installation into the solid wall, similar principles apply: the back box depth keeps the modules of 45 mm deep from fitting and it gives no trouble if it is reasonably easy to drill the brick wall for a 47 mm back box.
For the case of a wall box outlet, from 30 cm to 45 cm from the center to the top surface of the floor. In the case of a genuine floor box outlet, there is no height, since the lid needs to be flush with the floor surface without protrusion.
Usually, the outlet must be raised by 6-9 cm, but the height must be also calculated while taking into consideration the plug height, since it can measure from 5 cm to 6 cm. So, the space must be planned accordingly.
There exist no definite regulations about the height of an outlet in most areas. However, there exist certain spacing rules and some public accessibility law for public buildings and rooms.
Yes, core drilling is needed as long as the engineer has issued an approval regarding the post-tensioned slab.
When measuring the box, keep in mind to consider the floor finish level, place the box after tiles are up, and verify the connector and the plate to avoid most of the problems concerning the installation of floor outlets.
In case your project requires a special module for the floor or for a countertop unit, please provide us with the plate, type of the module, and depth of the cavity, so we could inform you about the available options.
The first measurement of the height takes place on a blueprint whereas the second establishes the height on-site after it turns out the thickness of the constructions is 20 mm thicker than indicated in the drawing because it is the second option that matters the most. As for the practical aspect of the issue, it […]

When it comes to brass dimmers, people’s decisions are based on their appearance and whether they fit. Both of these things represent different sets of decisions, most of which cause problems when placing an order: the plate does not go with the box, the module cannot darken the lamps, or the gang overheats because no […]
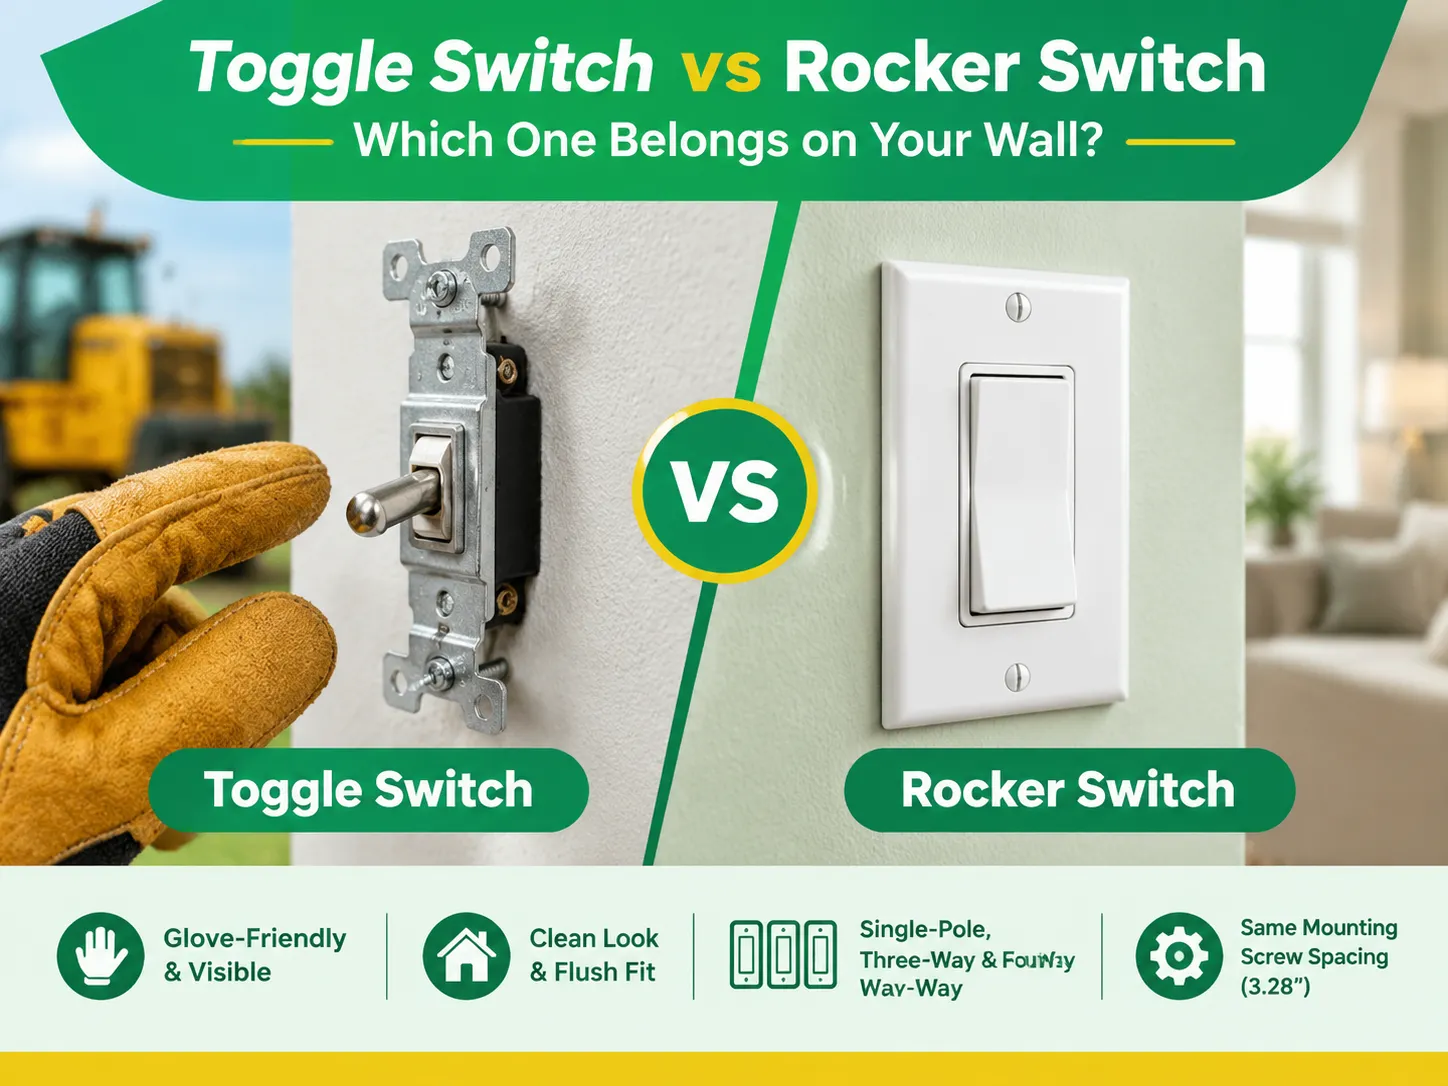
Both switches utilize the same circuitry, both of them fit into the same enclosure and both of them can be found in the same store aisle. However, in the end, all depends on three considerations which are not electricity-related: the look of the room, who uses it, and whether one wants a switch which can […]

 No.6 Tuozhan Road, Leshang Pioneer Park,Yueqingwan Bay Harbor,Yueqing city,Zhejiang Province


